crud operation using popup modal in asp.net web forms
CRUD Operations with Modal Popup in ASP.NET Web Forms: Step-by-Step
CRUD Operations with Modal Popup in ASP.NET Web Forms: Step-by-Step
1. Introduction
· Explanation of CRUD operations
· Importance of modal popups in web forms
2. An Overview: ASP.NET Web Forms
· Brief overview of ASP.NET Web Forms
· Advantages of using Web Forms for CRUD operations
3. Setting Up the Development Environment
· Installing Visual Studio
· Creating a new Web Forms project
4. Adding a Modal Popup to the Web Form
· Explaining the purpose of a modal popup
· Steps to add a modal popup control in ASP.NET Web Forms
5. Designing the User Interface
· Creating a form layout for CRUD operations
· Styling the modal popup using CSS
6. Implementing Create Operation
· Handling form submission
· Validating user input
· Saving data to the database
7. Implementing Read Operation
· Retrieving data from the database
· Displaying data in the modal popup
8. Implementing Update Operation
· Pre-populating form fields with existing data
· Modifying and saving updated data
9. Implementing Delete Operation
· Confirming deletion using the modal popup
· Removing data from the database
10. Conclusion
· Recap of the tutorial
· Encouraging further exploration and practice
11. FAQs
- FAQ 1: Can I use modal popups in other web frameworks?
- FAQ 2: Can the modal popup’s appearance be changed?
- FAQ 3: How do I deal with CRUD operation concurrency problems?
- FAQ 4: Are there any alternate CRUD operation techniques supported by ASP.NET??
- FAQ 5: Can I utilize this course with more recent ASP.NET Web Forms versions?
Introduction
CRUD operations are fundamental for managing data in any web they entail making new records, accessing data that already exists, updating records, and eliminating surplus data. Contrarily, modal popups offer a sophisticated method of engaging consumers without leaving the current page. They provide an easy and clear user interface.
Understanding ASP.NET Web Forms
Developers can create dynamic web pages with server-side controls using the sophisticated and feature-rich ASP.NET Web Forms framework. For quick web application development, it offers a variety of controls and components and adheres to the event-driven programming paradigm.
Setting Up the Development Environment
Our development environment needs to be set up before we can begin the tutorial. The integrated development environment (IDE) for creating ASP.NET Web Forms applications, Visual Studio, to be installed first. Once installed, create a new Web Forms project to begin our journey.
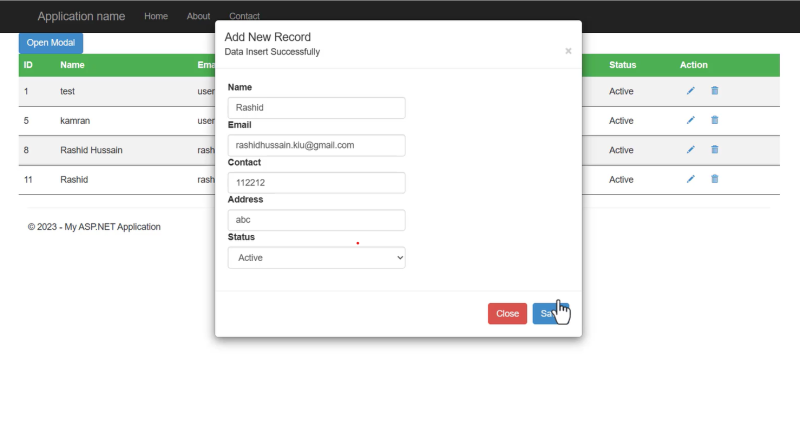
Adding a Modal Popup to the Web Form
To implement CRUD operations with modal popups, we first need to add a modal popup control to our Web Form. This control will serve as the container for our forms and provide the necessary functionality for displaying and hiding the popup.
<div class="container"> <div class="modal fade" id="mymodal" data-backdrop="false" role="dialog"> <div class=" modal-dialog modal-dailog-centered"> <div class="modal-content"> <div class="modal-header"> <h4 class="modal-title">Add New Record</h4> <asp:Label ID="lblmsg" Text="" runat="server" /> <button type="button" class="close" data-dismiss="modal">×</button> </div> <div class="modal-body"> <label>Name</label> <asp:TextBox ID="txtname" CssClass="form-control" placeholder="Name" runat="server" /> <label>Email</label> <asp:TextBox ID="txtmail" CssClass="form-control" placeholder="Email" runat="server" /> <label>Contact</label> <asp:TextBox ID="txtcontact" CssClass="form-control" placeholder="Contact" runat="server" /> <label>Address</label> <asp:TextBox ID="txtaddress" CssClass="form-control" placeholder="Address" runat="server" /> <asp:HiddenField ID="hdid" runat="server"/> <label>Status</label> <asp:DropDownList ID="dllstatus" CssClass="form-control" runat="server"> <asp:ListItem Value="">Select Status</asp:ListItem> <asp:ListItem Text="Active" /> <asp:ListItem Text="Inactive" /> </asp:DropDownList> </div> <div class="modal-footer"> <button type="button" class="btn btn-danger" data-dismiss="modal">Close</button> <asp:Button ID="btnsave" CssClass="btn btn-primary" OnClick="btnsave_Click" Text="Save" runat="server" /> </div> </div> </div> </div> </div>
Designing the User Interface
It is now time to create the user interface for our CRUD processes after adding the modal popup. We will design a form layout with input fields for data and submit, update, and delete buttons for records. Additionally, we’ll apply some CSS styles to make the modal popup visually appealing.
.
<section Id="section">
<div class="row match-height">
<div class="col-12">
<div class="card">
<div class="card-header">
<asp:Button Text="Open Modal" ID="modal" CssClass="btn btn-primary" OnClick="modal_Click" runat="server" />

</div>
<div class="card-content">
<div class="card-body">
<div class="row">
<div class="col-md-12 col-12">

<table>
<asp:Repeater ID="rptr1" DataSourceID="ds1" runat="server">
<HeaderTemplate>
<tr>
<th>ID</th>
<th>Name</th>
<th>Email</th>
<th>Contact</th>
<th>Address</th>
<th>Status</th>
<th>Action</th>

</tr>
</HeaderTemplate>
<ItemTemplate>

<tr class="separator">
<td> <%# Eval("t_id") %></td>
<td> <%# Eval("name_") %></td>
<td> <%# Eval("email") %></td>
<td> <%# Eval("contact") %></td>
<td> <%# Eval("address_") %></td>
<td> <%# Eval("status_") %></td>

<td>
<asp:LinkButton ID="btnupdate" CommandName="Update" OnCommand="btnupdate_Command" CommandArgument='<%#Eval("t_id") %>' CssClass="btn btn-sm brn-primary" runat="server" ><i class="glyphicon glyphicon-pencil"></i></asp:LinkButton>

<asp:LinkButton CommandName="Delete" ID="btndlt" CommandArgument='<%#Eval("t_id") %>'
OnClientClick="return confirm('Are you sure you want to delete this !');"
OnCommand="btndlt_Command" CssClass="btn btn-sm brn-danger" runat="server" ><i class="glyphicon glyphicon-trash"></i></asp:LinkButton>

</td>
</tr>

</ItemTemplate>
</asp:Repeater>
</table>
</div>
</div>

</div>

</div>
</div>

</div>

</div>

</section>
<asp:SqlDataSource ID="ds1"
ConnectionString="<%$ConnectionStrings:connection_ %>" runat="server"
SelectCommand="select * from test"
/>
Implementing Create Operation
The first CRUD operation we’ll tackle is creating new records Data will be saved to the database, form submissions will be handled, and user input will be checked. Before the end of this phase, users will be able to add new entries to our application.
protected void btnsave_Click(object sender, EventArgs e)
{
string connectionstring = ConfigurationManager.ConnectionStrings["connection_"].ConnectionString;
using (SqlConnection conn = new SqlConnection(connectionstring))
{
conn.Open();
SqlCommand cmd;
if (!string.IsNullOrEmpty(hdid.Value))
{
string id = hdid.Value;
cmd = new SqlCommand("Update test set name_=@name, email=@email,contact=@contact," +
"address_=@address,status_=@status where t_id=@id", conn);
cmd.Parameters.AddWithValue("@id",id);
}
else
{
cmd = new SqlCommand("insert into test(name_,email,contact,address_,status_)" +
" values(@name,@email,@contact,@address,@status)", conn);
}

cmd.Parameters.AddWithValue("@name", txtname.Text);
cmd.Parameters.AddWithValue("@email", txtmail.Text);
cmd.Parameters.AddWithValue("@contact", txtcontact.Text);
cmd.Parameters.AddWithValue("@address", txtaddress.Text);
cmd.Parameters.AddWithValue("@status", dllstatus.SelectedItem.ToString());

int rowsaffected = cmd.ExecuteNonQuery();
conn.Close();
if (rowsaffected > 0)
{
lblmsg.Text = "Data Insert Successfully";
}
else
{
lblmsg.Text = "Error While inserting Data";

}
string script = "$('#mymodal').modal('show');";
ClientScript.RegisterStartupScript(this.GetType(), "Popup", script, true);
rptr1.DataBind();

}

}
Implementing Read Operation
With the create operation in place, we move on to the read operation. We’ll retrieve data from the database and display it in the modal popup. This will allow users to view existing records without leaving the current page.
<asp:SqlDataSource ID="ds1"
ConnectionString="<%$ConnectionStrings:connection_ %>" runat="server"
SelectCommand="select * from test"
/>
Implementing Update Operation
Next, we’ll implement the update operation. We’ll pre-populate form fields with existing data and provide the ability to modify and save updated information. This will enable users to edit records directly within the modal popup.
protected void btnupdate_Command(object sender, CommandEventArgs e)
{
string id = e.CommandArgument.ToString();
hdid.Value = id;

string connectionstring = ConfigurationManager.ConnectionStrings["connection_"].ConnectionString;

using (SqlConnection conn = new SqlConnection(connectionstring))
{
conn.Open();
SqlCommand cmd = new SqlCommand("select * from test where t_id=@id", conn);
cmd.Parameters.AddWithValue("@id", id);
SqlDataReader dataReader = cmd.ExecuteReader();

if (dataReader.Read())
{
txtname.Text = dataReader["name_"].ToString();
txtmail.Text = dataReader["email"].ToString();
txtcontact.Text = dataReader["contact"].ToString();
txtaddress.Text = dataReader["address_"].ToString();
dllstatus.SelectedValue = dataReader["status_"].ToString();
}
dataReader.Close();

}
ScriptManager.RegisterStartupScript(this,GetType(),"OpenModalScript","$('#mymodal').modal('show');",true);

}
Implementing Delete Operation
The final CRUD operation we’ll cover is deleting records. We’ll implement a confirmation mechanism using the modal popup to ensure users want to proceed with the deletion. Once confirmed, we’ll remove the data from the database.
protected void btndlt_Command(object sender, CommandEventArgs e)
{
string id = e.CommandArgument.ToString();

string connectionstring = ConfigurationManager.ConnectionStrings["connection_"].ConnectionString;

using (SqlConnection conn = new SqlConnection(connectionstring))
{
conn.Open();
SqlCommand cmd = new SqlCommand("delete from test where t_id=@id", conn);
cmd.Parameters.AddWithValue("@id", id);
cmd.ExecuteNonQuery();

}
rptr1.DataBind();
}
Conclusion
You now possess the knowledge and abilities necessary to master CRUD operations using modal popups in ASP.NET Web Forms thanks to this step-by-step tutorial. You have learnt how to easily create, read, update, and remove records inside the context of a modal popup by following the stated methods.
Congratulations on finishing this tutorial and taking an important step towards mastering ASP.NET Web Forms development. Keep up the good work and enjoy the journey of mastering CRUD operations with modal popups!
FAQs
FAQ 1: Can I use modal popups in other web frameworks?
The ideas and guidelines presented in this tutorial can be used with more recent iterations of the framework, even though it concentrates on ASP.NET Web Forms. As a result, it is advised to consult the official manual. However, keep in mind that some functionality or syntax may have changed.
FAQ 2: Can the modal popup’s appearance be changed?
Absolutely! Modal popups can be customized using CSS. You can modify the size, color, font, and other visual aspects to match your application’s design and branding.
FAQ 3: How do I deal with CRUD operation concurrency problems?
To handle concurrency issues, you can implement techniques like optimistic concurrency or pessimistic concurrency. Optimistic concurrency relies on versioning and conflict resolution, while pessimistic concurrency uses locks and exclusive access. The approach depends on your application’s requirements and the database system you are using.
FAQ 4: Are there any alternate CRUD operation techniques supported by ASP.NET?
Yes, ASP.NET also offers other approaches for performing CRUD operations, such as using Web API for building RESTful services or using Entity Framework for object-relational mapping. These approaches provide flexibility and can be suitable for different scenarios.
FAQ 5: Can I utilize this course with more recent ASP.NET Web Forms versions?
Although ASP.NET Web Forms is the article’s primary focus, the concepts and recommendations presented here can also be applied to more modern versions of the framework. You are suggested to review the official documentation because certain functionality or syntax could have changed
Video Tutorial
Source Code
Thank you for reading this article. Leave a comment if you have any question about this article. Please don’t forget to subscribe our official YouTube Channel RashiCode for more information.